Factory Service Manuals:
JEEP CHEROKEE FACTORY SERVICE MANUAL DOWNLOADS
These manuals are the same manuals that service technicians use in the dealer service departments. They are MUCH more detailed than the popular Chilton's or Haynes Manuals. You need Adobe Acrobat (available free at www.adobe.com) to view these files. The manual for the '00 XJ is interactive, so you can click through it.
-2000 Cherokee Factory Service Manual (FSM) (42 MB)
-1993 Cherokee Factory Service Manual (FSM) (Incomplete) (15.3 MB)
-1988 Cherokee Factory Service Manual (FSM) (17 MB)
UPDATE:
Dear Nate, I work for the exclusive trademark licensing agency for the MOPAR Division of DaimlerChrysler Corp. We have been alerted to your website due to the JEEP Manuals you have made available for download for free. It appears these are DaimlerChrysler vehicles manuals by your description calling them "Factory Service Manuals". If these are DaimlerChrysler manuals and you are not licensed to sell these vehicle manuals for free, you must remove them from your website. Please contact me immediately to inform me of your status and the status of this free download. My contact info is [edit], Trademarketing Resources, Inc. [edit] and my email is above. I look forward to hearing from you.
Regards, Cindy Julian
Tech Tips
This radiator installation job went fairly easy. Took me about 2 hours taking my time. Instead of getting a stock 2-core replacement for my XJ, I picked up a GDI 3-core radiator from radiator.com for $160 shipped to my door. It requires no major modifications (except for the bracket that connects the radiator to the condenser, if equipped.) I also plugged up the auto transmission cooler line plugs with silicone, as my XJ is a 5 speed. The following pictures were taken during my installation project, check out how SHOT the old radiator was! I'm surprised she didn't leave me stranded...
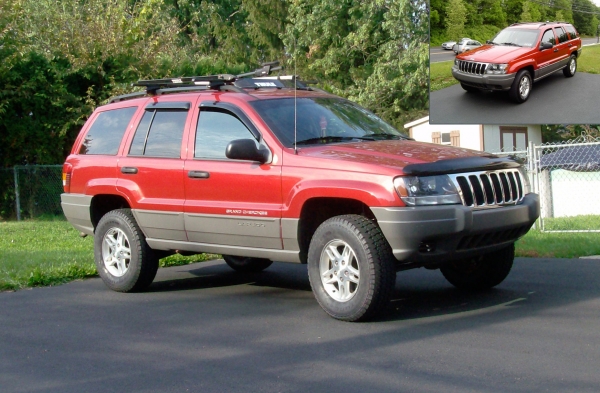
I picked up this THULE rack system for less than $100 bucks... feet were $45 off ebay shipped, bars were $45 from a local bike shop! Nice thing is, i can haul 4x8 sheets of materials, bikes, skis, snowboards, kayaks, canoes, boats, luggage boxes, you name it! I think it is a totally cooler rack than a factory rack and is certainly a lot stronger. Jeep really needed something more to make it stand out. (PS. end caps will be installed soon too, but they didn't come with the feet so i have to special order them...)
Using steel square tubing from Sears, and an assortment of bolts, nuts, washers, u-bolts, and spray paint, i fabricated this roof-top spare tire carrier. I attached it to my existing THULE roof rack. No bungee cords here, she's bolted together!
I ordered these mounts (pictured left) from quadratec, $100 shipped to my door for the pair. Installing them was certainly NOT a walk in the park, but nothing to terrible either. Had to take the airbox out to get the passenger side mount in, that went fine. Had to shave a part of the urethane bushing to clear the bracket but i'd consider that only a "minor modification" compared to what a headache the drivers' side was. After jacking the motor up and down 100 times and even trying to PULL THE MOTOR FORWARD half an inch, it was easier just to grind out the bolt holes so that the mount would just drop right in. Driving it, I certainly do feel the vibrations you hear about when using urethane motor mounts but it is certainly better than the original stock mounts after 220k miles (pictured right). The design of the new mounts has the upper hand over the stock mounts, it seems that you could put 500HP to these mounts and they'd be fine all day long. The bushing itself is about an inch wider, not to mention its a harder material than the spongy stock mounts!
Lift Kit (1990 XJ)
For my jeep, I’m going do it the RIGHT way. A 3.5” lift will offer better handling but still maintain drivability. There are several differences between these small lifts: some have add-a-leafs for the rear, and some have complete rear spring packs. For $100 or so more, I chose the complete rear spring packs as my Cherokee's rear leaf springs are very tired, I chose to order my lift from Rusty's Off-Road, and would certainly do so again.
The kit is advertised on their website for $418, and with shipping UPS ground to my door is $550. Quite a lot for shipping but this is extremely heavy, and I'd rather not drive to Arkansas.
For about a week before the project, I sprayed down every bolt I could find with PB Blaster, a very strong penetrant. This proved to be a huge helper as many bolts came apart very easily.
Finally, we actually started on the jeep. I began on the rear (expecting it to be easily done in that one day, as we started at like 9am...)
First, we jacked it up and took the wheels off. then we started unbolting the sway-bars and rear axle u-bolts.
This took us until about 2pm... then it was time to ‘attempt’ to do the spring bolts... the rear took 2 breaker bars with some long pipes off the ends to get enough leverage to get them loose:
Unfortunately, the front bolts broke the nuts freee from the welds off inside the frame... So they were stuck tight. We called it a day around 8pm.
The next day, we on getting those bolts out. I basically ran around all day looking for a cutting torch. I ended up finding one from Trevor at Cycle Sports (my old manager) and he loaned me his torch. A buddy of mine came over and torched those bolts up WHITE HOT... then we whacked at them with the hammer, expecting them to break off. no such luck. these are some tough bolts.
Day 3 - I made a trip to sears to get the reciprocating saw blades (sawzall) and a dremel tool. The bolts were finally removed at this point and the old leaf springs were thrown into my driveway as i stood over them triumphantly. Unfortunately, the fun was not over. I used the cutting wheels supplied with my dremel tool, and cut holes in the bottom of the little pockets so the nuts would come out of the frame. Some new bolts from the dealer and nuts from the hardware store and I was ready to start putting it back together.
Installation was very straight forward, except the new leaf springs didn’t line up with the rear shackles. A few tries with the jack under the spring and things finally went back together. After 4 days of taking over my parent's garage, I was finally able to take her out for a little ride. The rear was way higher than the front now and the headlights pointed right at the ground. Not too smart for a night-time joy ride but I was going through withdrawal.
After such a hard time with the rear springs, and only a few days left of my Thanksgiving break from school, I threw up the white flag and had a shop throw the front shocks/springs in.


![[SOLVED] Cat Pees Outside the Litter Box](/media/k2/items/cache/8b73a42f665d6a2641fcaae19abdf883_M.jpg?t=20220317_161306)

